Sector frames are a type of building block for the Map and Model layers.
Use sector frames to group functionally-related building blocks in a model. For example, in a model of a business organization, you might use a sector to represent each of the major processes under consideration. You might have a manufacturing sector, a marketing sector, a human resources sector, and a financial sector in the model. In a model of a food web, each of the major trophic levels might be represented by different sectors.
When you run a model with sectors, you can run the entire model, including all sectors, or you can choose to run selected sectors.
You can also use sector frames to display graphical images or to play QuickTime movies.
Note: If the Link High-Level Map to Model check box is selected in the Interface Preferences dialog box, placing a sector frame on the Map or Model layer automatically places a linked process frame on the Interface layer. Model users can then navigate from a sector frame to its linked process frame.
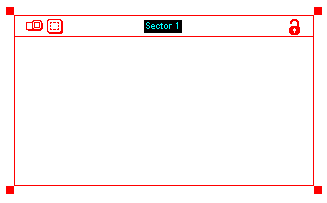
When you place a sector frame on the model diagram, it looks like this:
The following sections describe how to work with sector frames by
Note: If the Link High-Level Map to Model check box is selected in the Interface Preferences dialog box, a sector frame is automatically created on the Map and Model layers when you place a process frame on the Interface layer (and vice versa). Similarly, if you delete a sector or process frame, its linked process or sector frame is also deleted.
 tool.
tool.Click the diagram to place the sector frame.
Note: If you try to place a sector frame where it will overlap another sector frame, a message appears to tell you that there is not enough room to place the sector frame in that location. To place the sector frame, either move it to a different location or move/resize the other sector frame so there are no overlaps.
Drag the sector frame to the desired location.
Note: The software does not allow you to move a sector frame to a location where it overlaps another sector frame.
If the sector frame is locked, all building blocks considered part of the sector will move with the sector frame.
Note: If you move a locked sector frame over another building block. That building block is grayed out to indicate it is not considered part of the sector. If you want to make a building block part of a sector, you need to drag it into the sector as opposed to moving the sector frame on top of it.
When the sector frame is the size you want, release the mouse button.
Note: When you resize a locked sector frame, the software will not let you decrease its size to the point where any of the contained building blocks are not fully contained within the frame's borders.
Type the new name:
Note: You can also edit the name for a sector frame by editing the name in the Name box in the Sector dialog box.
If the sector frame is linked to a process frame, the process frame is automatically renamed to match the new sector frame name.
Double-click the sector frame's border or within its header area, or select the sector frame and then choose Open Selection from the Model menu (or right-click the sector frame and then choose Open from the menu that appears).
The Sector dialog box opens.
The primary use for sector frames is to group together functionally related chunks of model structure. This allows you to run only those building blocks together, separate from the rest of the model.
Use the following procedure to group building blocks together with a sector frame. For information about running sectors, see Running models.
On the Map or Model layer, place a sector frame over the building blocks that you want to include in a sector.
Note: To be considered part of the sector, a building block must be completely enclosed within the sector frame and it must have been placed in the sector frame while the sector was unlocked.
 button in the sector frame's header.
Once you've defined one or more sectors in your model, you can run selected sectors independently from the rest of the model. For more information, see Running sectors.
Building blocks that are considered part of the sector will run when you choose the Run Sector(s) command from the Run menu (for more information about selecting sectors to run, see Sector Specs dialog box).
Click in the sector frame's header.
All building blocks that are part of the sector are highlighted. Any building blocks that are completely inside the sector frame's borders but are not considered part of the sector appear in gray.
You can add a picture to a sector frame by dragging and dropping an image file from your computer onto the sector frame, or by using the options in the Sector dialog box.
Notes: Note: For a list of supported image file formats, see Supported graphic file formats.
For best results, put all picture files in a directory entitled "graphics", located in the same directory as the model file.
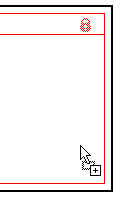
Drag an image file from any location on your computer onto the sector frame.
When a black border appears around the sector frame and the pointer changes to a "+", release the mouse button to drop the image onto the sector frame.
–Or–
Double-click its border or within its header area, or select the sector frame and then choose Open Selection from the Model menu (or right-click the sector frame and then choose Open from the menu that appears).
The Sector dialog box opens.
To have the sector frame's name appear as the picture in the sector frame, select the Use Name option, and then click the Import Picture button to format the text in the Text Box dialog box.
Note: To edit the name that appears as a picture in the sector frame, edit the sector frame's name in its header or in the Name box of the Sector dialog box. For more information, see To rename a sector frame.
To import a picture from the clipboard to appear in the sector frame, make sure that you have copied the image you want to the clipboard by using the Copy command, then select the From Clipboard option, and click the Import Picture button.
Tip: If you have copied a picture to the clipboard, you can also paste the picture to the sector frame by choosing Paste from the Edit menu.
You can add a movie to a sector frame by using the options in the Sector dialog box.
Notes: To assign a movie to a sector frame, your computer must have QuickTime installed.
For best results, put all movie files in a directory entitled "movies", located in the same directory as the model file.
Double-click its border or within its header area, or select the sector frame and then choose Open Selection from the Model menu (or right-click the sector frame and then choose Open from the menu that appears).
The Sector dialog box opens.
To assign a movie to the sector frame, click the Assign Movie button, and then navigate to and select the QuickTime (.MOV) movie file you want to use. The first frame of the selected movie will be displayed in the center of the sector frame.
Note: If you have already assigned a movie to this sector frame, an asterisk (*) appears on the Assign Movie button.
Note: Although you can assign movies to more than one sector frame in a model, you can play only one movie at a time.
Notes: The movie does not have any connection to the model or its performance.
When you first place a sector frame, it is transparent, so you can see the parts of the model over which it lies. You can fill the sector frame with an opaque fill to obscure the model within the sector frame.
Note: A picture or QuickTime movie assigned to the sector frame will display when you make the sector frame opaque.
To make a transparent sector frame opaque, click the  button in the top-left corner of the sector frame.
Note: A sector frame is automatically locked when you make it opaque. The sector frame will remain locked if you make it transparent until you unlock it.
When a sector frame is locked, any building block considered part of the sector will retain its position relative to the frame when you move or copy the frame. In addition, if you resize a locked sector frame, the software will not let you decrease its size to the point where any of the contained building blocks are not fully contained within the frame's borders.
Note: A sector frame is automatically locked when you make it opaque. The sector frame will remain locked if you make it transparent until you unlock it.
 in the upper-right corner of the sector frame.
 in the upper-right corner of the sector frame.
If the Link High-Level Map to Model check box is selected in the Interface Preferences dialog box, placing a sector frame on the Map or Model layer automatically places a linked process frame on the Interface layer.
Use the following procedure to navigate from the sector frame to its linked process frame:
 .
. See Also